[Deeplearning(pytorch)] 15. cGAN으로 생성 제어하기
본 포스팅은 “펭귄브로의 3분 딥러닝, 파이토치맛” 책 내용을 기반으로 작성되었습니다. 잘못된 내용이 있을 경우 지적해 주시면 감사드리겠습니다.
15-1. cGAN으로 원하는 이미지 생성하기
14장에서의 GAN 모델은 ‘여러 종류의 패션 아이템 중 무엇을 생성하라!’ 라고 지시하는 로직이 없다. 즉, 사용자가 원하는 패션 아이템을 생성하는 능력은 없고 무작위 벡터를 입력받아 무작위로 패션 아이템을 출력하는 것이다.
이번에는 출력할 아이템의 종류를 입력받아 그에 해당하는 이미지를 생성하는 모델인 조건부 GAN cGAN(Conditional GAN)을 만들 것이다. 이를 구현하는 방법은 생성자와 판별자의 입력에 레이블 정보를 이어붙이는 것이다. cGAN에서는 그림처럼 생성자와 판별자에 레이블 정보가 들어간다.

그림 15-1. cGAN 모델 구조
15-2. 조건부 생성자와 판별자
import os
import torch
import torchvision
import torch.nn as nn
import torch.optim as optim
from torchvision import transforms, datasets
from torchvision.utils import save_image
import matplotlib.pyplot as plt
import numpy as np

# 하이퍼파라미터
EPOCHS = 300
BATCH_SIZE = 100
USE_CUDA = torch.cuda.is_available()
DEVICE = torch.device("cuda" if USE_CUDA else "cpu")
print("Using Device: ", DEVICE)

# Fashion MNIST 데이터셋
trainset = datasets.FashionMNIST('./.data',
    train = True,
    download = True,
    transforms = transforms.Compose([
      transforms.ToTensor(),
      transforms.Normalize((0.5,), (0.5,))
    ]))

train_loader = torch.utils.data.DataLoader(
  dataset = trainset,
  batch_size = BATCH_SIZE,
  shuffle = True)
(결과) Using Device: cpu
이번 예제에서는 생성자와 판별자가 하나의 입력과 더불어 레이블 정보까지 두 가지 입력을 받는다. 무작위 텐서(z)의 크기는 100으로 정하자. 우리는 레이블에 대한 정보도 크기 10인 텐서로 만들어 넣을 것이므로 첫 계층은 110개의 값을 받게 된다. embed() 함수는 ‘배치 x 1’ 크기의 레이블 텐서를 받아 ‘배치 x 10’의 연속적인 텐서로 전환한다. 이렇게 하는 이유는 연속적인 값이 학습에 더 유용하기 때문이다!
# 생성자
class Generator(nn.Module):
  def __init__(self):
    super().__init__()

    self.embed = nn.Embedding(10, 10) # 임베딩할 단어 개수(0~9)를 10개 요소 갖는 1차원 벡터로 임베딩

    self.model = nn.Sequential(
      nn.Linear(110, 256),
      nn.LeakyReLU(0.2, inplace=True), # inplace=True 는 입력을 복사하지 않고 바로 조작한다는 뜻!
      nn.Linear(256, 512),
      nn.LeakyReLU(0.2, inplace=True),
      nn.Linear(512, 1024),
      nn.LeakyReLU(0.2, inplace=True),
      nn.Linear(1024, 784),
      nn.Tanh()
    )

  def forward(self, z, labels):
    c = self.embed(labels)
    x = torch.cat([z, c], 1) # 두 벡터를 이어붙이는 연산
    return self.model(x)

그림 15-2. cGAN 생성자
cGAN의 판별자 역시 레이블 정보를 받는다. 이때 생성자에서 이미지를 만들때 쓴 레이블 정보를 입력받아 “레이블이 주어졌을때 가짜인 확률과 진짜인 확률”을 추정한다고 생각하면 된다. 판별자에게도 레이블 정보를 전달하기 위해 이미지 크기에 10을 더해준다.
# 판별자
class Discriminator(nn.Module):
  def __init__(self):
    super().__init__()

    self.embed = nn.Embedding(10, 10)

    self.model = nn.Sequential(
      nn.Linear(794, 1024),
      nn.LeakyReLU(0.2, inplace=True),
      nn.Dropout(0.3),
      nn.Linear(1024, 512),
      nn.LeakyReLU(0.2, inplace=True),
      nn.Dropout(0.3),
      nn.Linear(512, 256),
      nn.LeakyReLU(0.2, inplace=True),
      nn.Dropout(0.3),
      nn.Linear(256, 1),
      nn.Sigmoid()
    )

  def forward(self, x, labels):
    c = self.embed(labels)
    x = torch.cat([x, c], 1)
    return self.model(x)

그림 15-3. cGAN 판별자
# 모델 인스턴스를 만들고 모델의 가중치를 지정한 장치로 보내기
D = Discriminator().to(DEVICE)
G = Generator().to(DEVICE)

# 이전 교차 엔트로피 오차 함수
criterion = nn.BCELoss()

# 생성자와 판별자를 최적화할 Adam 모듈
d_optimizer = optim.Adam(D.parameters(), lr=0.0002)
g_optimizer = optim.Adam(G.parameters(), lr=0.0002)
데이터로더의 두 번째 반환값도 사용할 것이므로 레이블 표기를 해준다. 그리고 일반 GAN 예제와 같이 진짜와 가짜 레이블을 만든다.
total_step = len(train_loader)
for epoch in range(EPOCHS):
  for i, (images, labels) in enumerate(train_loader):
    images = images.reshape(BATCH_SIZE, -1).to(DEVICE)

    # '진짜'와 '가짜' 레이블 생성
    real_labels = torch.ones(BATCH_SIZE, 1).to(DEVICE)
    fake_labels = torch.zeros(BATCH_SIZE, 1).to(DEVICE)

    # 판별자가 진짜 이미지를 진짜로 인식하는 오차 계산(데이터셋 레이블 입력)
    label = labels.to(DEVICE)
    outputs = D(images, labels)
    d_loss_real = criterion(outputs, real_labels)
    real_score = outputs

    # 무작위 텐서와 무작위 레이블을 생성자에 입력해 가짜 이미지 생성
    z = torch.randn(BATCH_SIZE, 100).to(DEVICE)
    g_label = torch.randint(0, 10, (BATCH_SIZE,)).to(DEVICE) # 0~9 중 랜덤으로 정수 100개 생성
    fake_images = G(z, g_label)

    # 판별자가 가짜 이미지를 가짜로 인식하는 오차 계산
    outputs = D(fake_images, g_label)
    d_loss_fake = criterion(outputs, fake_labels)
    fake_score = outputs

    # 진짜와 가짜 이미지를 갖고 낸 오차를 더해서 판별자의 오차 계산
    d_loss = d_loss_real + d_loss_fake

    # 역전파 알고리즘으로 판별자 모델의 학습을 진행
    d_optimizer.zero_grad()
    g_optimizer.zero_grad()
    d_loss.backward()
    d_optimizer.step()

    # 생성자가 판별자를 속였는지에 대한 오차 계산(무작위 레이블 입력)
    fake_iamges = G(z, g_label)
    outputs = D(fake_images, g_label)
    g_loss = criterion(outputs, real_labels)

    # 역전파 알고리즘으로 생성자 모델의 학습을 진행
    d_optimizer.zero_grad()
    g_optimizer.zero_grad()
    g_loss.backward()
    g_optimizer.step()

  print('이폭 [{}/{}] d_loss:{:.4f} g_loss: {:.4f} D(x):{:.2f} D(G(z):{:.2f}'.format(epoch, EPOCHS, d_loss.item(), g_loss.item(), real_score.mean().item(), fake_score.mean().item()))
(결과) 이폭 [0/300] d_loss:0.1637 g_loss: 6.0606 D(x):0.93 D(G(z):0.03
       이폭 [1/300] d_loss:0.5367 g_loss: 4.3683 D(x):0.82 D(G(z):0.14
       이폭 [2/300] d_loss:0.4334 g_loss: 3.6603 D(x):0.87 D(G(z):0.16
       이폭 [3/300] d_loss:0.4690 g_loss: 3.2239 D(x):0.89 D(G(z):0.19
       ...
       이폭 [297/300] d_loss:1.3807 g_loss: 0.8985 D(x):0.55 D(G(z):0.47
       이폭 [298/300] d_loss:1.4040 g_loss: 0.9613 D(x):0.52 D(G(z):0.44
       이폭 [299/300] d_loss:1.2241 g_loss: 0.8692 D(x):0.61 D(G(z):0.44
이제 아이템 번호를 골라 item_number 변수에 저장하고 해당 레이블 번호와 매핑된 아이템의 이미지를 출력하여 시각화해보자.
# 만들고 싶은 아이템 생성하고 시각화하기
item_number = 9 # 아이템 번호
z = torch.randn(1, 100).to(DEVICE) # 배치 크기 1
g_label = torch.full((1,), item_number, dtype=torch.long).to(DEVICE) # 1 크기를 갖는 item_number 텐서 생성
sample_images = G(z, g_label)
sample_images_img = np.reshape(sample_images.data.cpu().numpy()[0], (28, 28))
plt.imshow(sample_images_img, cmap='gray')
plt.show()
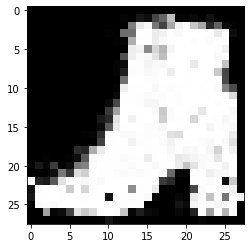
그림 15-4. 코드 결과
Leave a comment